Beauty Abounds Watercolor Technique

Hello Peeps!

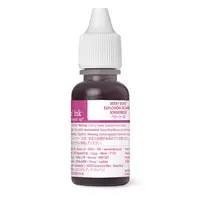
It has been quite a while since I was last here.  Sorry about that.  I’ve been really busy doing life!  🙂  But today I have a video for you on a pretty simple watercolor technique that anybody should be able to do and I mean anybody because if I can pull it off…anyone can.  Actually we did this technique at my April card club on Saturday and NO ONE’S  turned out bad!  Each piece was unique in its own way and ALL were very beautiful!  The ink colors I used in the watercolor are retiring along with the Berry Burst and Powder Pink Paper.  The watercolor paper is retiring as well, but Stampin’ Up! is not getting rid of it entirely.  They are bringing out another version.  If you still have questions after you watch the video, let me know.

A few items you will need when watercoloring that are not listed in any of the supply lists are a clip board, blue painters tape, paper towel,  and small trays to hold your ink.  I used the tops to embellishment container.  I always save the container when I’ve used up an embellishment.  They have come in handy for a multitude of uses.

I am also sharing photos of the other three cards we made at club along with their supply lists.  If you have questions on those you can email me about them as well.


Vibrant Vases Card

Supply List for Vibrant Vases Card


Half Full Card

I got the inspiration for this card from the Annual Catalog.  Please note the Berry Burst card stock is about to retire along with the Half Full stamp set.  So, if you want either one of these you need to order soon (before June 1).

Half Full Card Supply List


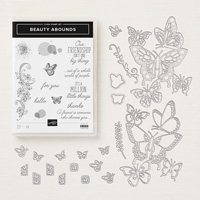
Beauty Abounds Bokeh Birthday

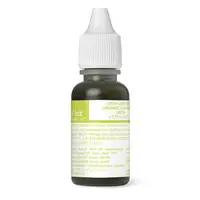
Please note the Lemon Lime Twist card stock and ink along with the stamp set Amazing Life are on the soon to be retiring list, so if you are interested in either you need to order soon (before June 1).  #simplestamping

Bokeh Birthday Card Supply List


So I hope you enjoyed your visit here today!  Until next time!

Happy Stamping!


Vertical Thank You

I am not posting a video today.  I will try to get one posted for this month by the early part of next week.  On Wednesday, my mother will be visiting from Ohio for three weeks, and I know that once she gets here there won’t be much stamping going on.  Mom and I usually cook when she visits.  We cook all of those things I grew up eating but normally don’t make.  One thing I would like to make while she is here is wedding soup.  I will do all of the work; she will just guide me through the process.  In other words, she will supervise.  🙂

Today’s card is one I made last weekend after my up line posted a template for all of us to use.  This is what I came up with.  This isn’t your standard size card in that it measures 3-1/2″ x 6″.  You will need a piece of 12″ x 12″ card stock to make it. I used the Vertical Greetings stamp set to make it.  Here is the template I used.

13512002_10208344278298874_1478530489127256773_nHere is the card I created.

Vertical Greetings Thank YouAs I stated earlier, the card base measures 3-1/2″ x 6″, so you will need to cut a piece of 12″ x 12″ card stock to measure 3-1/2″ x 12″ and fold it in half.  You will also need to use the envelope punch board to create an envelope for the card.  This size card CAN be mailed.  The smallest size the post office will accept is 3-1/2″ x 5-1/2″.  The Affectionately Yours Designer Series Paper measures 3-7/8″ x 3-1/2″, and I used the largest banner from the Banners Framelits.

Hope you like it.  It’s a really easy card to make.  Hope you enjoyed your visit.  Until next time…

Happy Stamping!

Josie2


Save

Save

Save

Save

Save

Save

Save

Recycled Paper Pumpkin Stamp Sets

You probably thought I dropped off the face of the Earth, but I didn’t.  I am still here.  Just been quite busy the last week or so.  I managed to sub four days last week.  I don’t know what possessed me!  By Friday I was thinking, “Working four days is too much for a retired person!”  So this week, I am only scheduled to work one day; tomorrow.  So far, I have one day scheduled for next week, but I am thinking I might schedule one or two more.

I have also been busy getting two bedrooms ready for painting this week.  Since we moved in here in 2001, I have been wanting to have the master bedroom painted, along with my son’s old room.  When we moved in, his room had air planes stenciled onto the walls because it was occupied by two little boys before him.  He was around 14 when we moved in, and I never repainted the room.  (Shame on me.)  Now that he is 28 and moved out, I have decided it is time!  My son came over on Sunday and helped clear out the rest of his stuff that he didn’t want.  All that is in there now are a few of his masculine decorations that he didn’t want to take, a bed, bookshelf and desk.  My husband has taken over the room with his computer, etc.  So I know he will appreciate not having stenciled air planes on the walls. LOL!

I have managed to do some stamping.  Two weeks ago I spent an entire day in my stamp room creating a gift set of note cards.  My daughter will be doing an expo in Denver in July.  She will be showcasing her line of clothing and jewelry. (Click the Freebird Philosophy  tab at the top of the page to go to her Etsy store.)  She asked me to share the booth with her and sell some of my creations.  So, you know how that goes.  Whatever we can do to help out our children, especially if we can do it…

I used a lot of old Paper Pumpkin stamp sets along with many current ones to create these cards.  Some of the cards are cased; some are my own creation.  I hope you enjoy looking at them, and if you have any questions about them, or would like to purchase a set or two, please let me know.

The first photo is of the chevron bag they will be wrapped in.  The decoration on the bag is my own original creation.

Note-cards-in-a-bag-1

The bag contains five note cards that look like this…

Note-cards-in-a-bag-6

This card is CASED from one I saw elsewhere.  The stamp sets are current photopolymer sets and Gorgeous Grunge.

Note-cards-in-a-bag-5

The birthday card is done using an old Paper Pumpkin set and Gorgeous Grunge.

Note-cards-in-a-bag-4

The thank you card is a combination of a current set (Gorgeous Grunge) and an old Paper Pumpkin Set. The ribbon I used was from Sale-a-bration and is no longer available.   The design is my own creation.

Note-cards-in-a-bag-3

This card was CASED from my friend and team mate, Dawn.  It uses the current Work of Art stamp set.

Note-cards-in-a-bag-2

Finally, the last card features Gorgeous Grunge, and the sentiment is from the first ever Paper Pumpkin kit.

Hope you enjoyed the cards as much as I enjoyed making them.  There is a list of all the Stampin’ Up! products I used to create these at the end of this post.

For more information on Paper Pumpkin,  click the tab at the top of this page.  When you are finished reading about it, click the Paper Pumpkin button on the right hand side of the page to enroll.

Until next time…(Hopefully it won’t be so long)

Happy Stamping!

Josie2


A Happy Thing

Today I am sharing two cards that remind me of a very happy thing; my trip to Italy in 2006 with my sister.  While we were there I remember seeing lemon trees, and I even purchased a few pieces of Deruta Italian pottery that was manufactured and hand painted in Umbria, Italy.    I purchased what I would call a serving platter, pasta serving bowl, and wine pitcher that are adorned with lemons.  You can see a photo of the pattern here.  I received my inspiration for these two cards from these three pieces of pottery.  I  used the Sale-a-bration set A Happy Thing when I created these two cards.  I also used the masking technique which I will explain at the end of my post.

Gold Lemon Thanks

I have always loved the way navy and yellow look together.  I think they are classic, and the colors always remind me of summer!  The “Thanks” card is embossed in gold and colored with Daffodil Delight Blendabilities.

Lemon Friendship

The sentiment on this friendship card is embossed in gold, but the lemons are not.  They are stamped in the Memento Tuxedo Black and colored with Daffodil Delight Blendabilities.

What is the masking technique?  If you are familiar with the stamp set I used, you know there is only one lemon image in the set.  Masking is when you stamp the image on scrap paper and cut it out.  You then stamp the image again onto the card stock you will be using.  After stamping, you cover it with the cut out image, re-ink your stamp and stamp another image right next to the first one you stamped.  When you do this, it will look like one is behind the other.  That’s why it is called masking.

Hope you enjoyed your visit here today. Until next time…

Happy Stamping!

Josie2

both lemons

Place an order with me in my online store and receive a free gift from me.