A Little of Everything!

Hi Stampers!

Just as my title suggests, I have a little of everything I’ve been working on lately to show you. I’ve not been faithful in creating videos for you, but that doesn’t mean I am not busy stamping and doing other stamping related things. It’s the one thing I like to do a little every day. If I don’t get to stamp, I feel like it has been a wasted day! 🙂 I’ll be showcasing four bundles in this post, so if you don’t see what you are looking for right away, keep scrolling.

I was recently busy preparing for our Fifteenth Annual Stampin’ for a Cure Event that I did with several other demonstrators. We started out 15 years ago raising money to help support those who are fighting breast cancer. A few years ago, we started working in partnership with a local hospital and all the money we raise goes to their Circle of Hope foundation. This foundation provides financial assistance to anyone battling cancer. We didn’t quite reach our goal of $5,000 this year but we raised over half of what we wanted; $3,500. I don’t think that’s too shabby for six women demonstrators. We gather donations for a silent auction, design six cards for people to come and make, and we donate our retired stamp sets and dies to sell in what we call our “garage sale.” We charge $5.00 an item in the garage sale and all the money goes to the foundation.

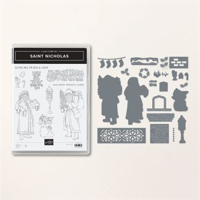
Other than working on Stampin’ for a Cure, I’ve been doing a little stamping on the side for my own enjoyment. When I first saw the Saint Nicholas Bundle in the September-December catalog, I knew I had to have it. For a while, I collected Santa figurines around Christmas, and I like the old-fashioned ones the best. Then I saw a video of Lisa Curcio’s interlocking accordion card and I knew this bundle and card would work well together. Please forgive me in that I used some retired designer series paper to create this card. I am trying to clear out my stash. Have a look and see what you think. You can catch Lisa’s video on YouTube. I’ve included a list of supplies I used on this card under the pictures.


The thing I like most about this Saint Nicholas is the colors are not traditional.  I like the idea of him having a blue coat!

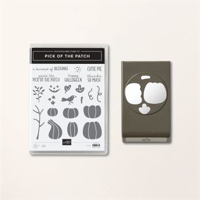
I hadn’t planned to purchase this next stamp set. Pick of the Patch wasn’t something that appealed to me right off the bat. But then a friend convinced me…   True! It doesn’t take much convincing to get me to buy a new stamp set. What can I say?  🙂


I like the colors in this card as well as the fact that they are not traditional fall colors. The card base measures 5-1/2″ x 8-1/2″ folded in half to create a standard size card. The Pretty Peacock piece of card stock measures  5-1/4″ x 4″  and I ran that through my Stampin’ Cut & Emboss Machine with one of the Basic 3D Embossing Folders .  Don’t forget to stamp the envelope!

The third bundle I am highlighting in this post is the Magical Meadow Bundle. I’m liking these new colors that we’ve got, and the new deckled circles and rectangles dies! In this card I used the first largest deckled rectangle die to cut out the Pretty Peacock layer and the second largest to cut the Moody Mauve layer. I then ran that layer through my Stampin’ Cut & Emboss Machine with the cut-out circles die in the top right corner. I did it twice, offsetting the die the second time. Then I ran that piece through the Exposed Brick 3D Embossing Folder. The base is a piece of Pebble Path card stock. I colored the images of the stamps with my Stampin’ Write markers using Pretty Peacock and Moody Mauve and stamped on Basic White card stock. The sentiment is stamped in Pebble Path and the “berries” are stamped off. I used Moody Mauve ink. The ribbon is retired, and it sort of matches the Pebble Path card stock and ink. It’s a small piece of Gray Granite Shimmer Ribbon.

And last, but definitely not least! This is my favorite of all I’ve shared today. My chicken sampler! If you know me, you know I love roosters. I probably have collected over one hundred roosters or “things” with roosters on them. My favorite are vintage roosters. My daughter mentioned the other day that she didn’t know what she is supposed to do with them when the time comes, and I told her to just get one of those big dumpsters that will fit the length of the drive way and start filling it up with whatever she and her brother don’t want.
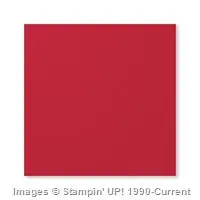
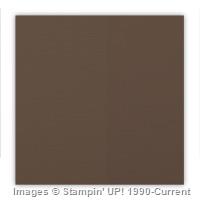
This sampler is mounted in a 12″ x 12″ shadow box frame. I the piece of Real Red card stock measures 11″ x 11″ and is mounted on a piece of 12′ x 12″ Early Espresso card stock . I used the Stitched Rectangles dies to mat the DSP which is retired. I made two of these recently, one was donated to our silent auction for Stampin’ for a Cure.
As with any of these projects, if you have any questions as to specific measurements, etc. email me and I will do my best to answer your questions.


Well, I hope you enjoyed your visit here today!  Until next time…

Happy Stamping!


shop on line 24/7

https://fancyforstampin.stampinup.net/


All Cooped Up!

Hello all! I’ve been MIA for the last several weeks.  I can’t say that I remember all that has kept me away and out of my stamp room.  I guess that is part of growing older.  I know I did something; I just can’t remember what it was.  🙂

My husband and I received our second Covid vaccine about 6 weeks ago.  It knocked me out of commission for about 24 hours afterwards with flu-like symptoms: fever, chills, muscle aches, and tiredness.  But like I said, it went away after about 24 hours.  I also helped my daughter move into her new home last week.  She is a first-time home buyer and she is in for a wonderful adventure!  So, I was out of town for about three days.  Oh! And since I am now fully vaccinated, I have gone back to doing in-person stamp club each month in my home.  I had my first one about a week and a half ago.  So that has kept me busy.  And I do remember spending a great deal of time on other crafts like making a hot air balloon Easter basket for my grand daughter and coffee filter flowers.  I made several paper-rose arrangements and an arrangement of hydrangeas out of coffee filters.  Although they are relatively easy to make, they are somewhat time consuming.  So I guess I’m not as scatterbrained as I initially thought.  I managed to remember everything that has been keeping me otherwise occupied along side the routine daily household stuff.

The card I’m sharing today pairs the Happy Birthday Chick stamp set with All Wired Up to give the appearance of a chicken behind chicken wire; All Cooped Up!  It is a simple card to make and I will share dimensions.  I used the standard shadow box card format to create it. ALSO, THE STITCHED SHAPES DIES ARE SET TO RETIRE, SO IF YOU WANT TO GET THEM, YOU NEED TO DO IT BEFORE THE END OF THIS MONTH!!!!!


Here are paper dimensions and a few directions that you will need to create this card.

  1. For card base you need two pieces of  Crumb Cake card stock that measure 5 1/2″ x 10-1/2″″, and 5-1/2″ x 4″. With the long edge of this piece at the top of your scoring tool, score at 1/2″, 4″, and 8″.  See diagram below.
  2. Run the 5-1/2″ x 4″ piece of through the Stampin’ Cut & Emboss machine using the Pinewood Planks 3D Embossing folder. This will be attached to the front of the card.
  3. Inside the card you need one piece of Basic White card stock  that measure 5 1/4″ x 3 1/4″.  If you click on the diagram below, it will tell you where inside this piece is attached.
  4. On the inside of the front cover I used a piece of 3-3/4″ x 5-1/4″ piece of leftover Oh So Ombre 6 x 6 DSP from Sale a-bration. On the outside, the DSPmeasures 3-1/4″ x 5-1/8″.
  5. One piece of window sheet cut to 3-3/4″ x 5-1/4″. Stamp this with StazOn ink using the All Wired Up stamp.
  6. Scraps of basic white to stamp the chicken images in Tuxedo Black Memento and sentiments in  Bermuda Bay.  I fussy cut around the sentiments and used the dies to cut the chicken images.
  7. Color the images with Stampin’ Blends.
  8. Cut an oval out of Crumb Cake cardstock and run it through the Stampin’ Cut & Emboss machine using the Pinewood Planks 3D Embossing folder.

If you watch my video from June 24, 2020 that can be found  here, it will tell you how to assemble this type of card.

If you have ANY questions about assembling this card, please get in touch with me.

Hope you enjoyed your visit here today!  Until next time…

Happy Stamping!