This March is Last September

Hello Everyone!

If you have been following me for awhile, you will know that I have been sharing my creations for the last six months of last year when I was a part of the Splitcoast Stampers Dirty Dozen Design Team.  So this month I will be sharing the cards I created for Splitcoast in September 2024.

The theme for last September was “Deja Hue. A play on words with Deja Vu: the illusion of remembering scenes and events when experienced for the first time. Instead of scenes and events, remember colors (hues)”. We were told to make a new card inspired by the colors of an older card in our gallery. It was also suggested we use a color combination that has meaning in our lives, like our school colors, wedding colors, favorite sports team colors, etc.   We were also directed to other color challenges on Splitcoast in order to find inspiration for our own creations. So…here are the cards I came up with.  I hope you enjoy them.

Cuppa Brew

I originally used these colors in my February 7, 2024 gallery card.  part of this month’s theme was to make a different card using the same colors as in a previous card.  I think these colors go well together with this adorable set which is still available.  Coffee is my go-to drink all day long.  It’s my go juice and I love this set.

STAMP SET:  Latte Love (Retired)

PAPER:  Copper Clay, Pool Party, Basic White

INK:  Copper Clay, Pool Party, Early Espresso

ACCESSORIES :  Latte Love

A Million Thanks

After watching a Brusho coloring technique video, I decided I would give it a try myself.  I’ve known about Brusho Water Color Crystals for a while…I’ve even owned some for a while as well, but I never bothered trying to use them.  since purple is my favorite color I decided to play with violet and a background stencil that I got somewhere along the line.  It might even be left over from my teaching days.  t took me a few tries to get the look I wanted.  My first few attempts created a watercolor mess.  Eventually I managed to pump out this.  not bad for ever using Brusho, I would say.

STAMPS:  Sweetly Scripted (Retired)

PAPER:  Night of Navy, Highland Heather, Watercolor Paper, Basic White

INK:  Night of Navy

TECHNIQUES:  Brusho Watercolor Crystals with a Stencil

Black, White & a Pop of Color

Part of this month’s theme was to watch a coloring technique video or to make a card out of the colors recommended in a previous color challenge.  This is my version of the color challenge that called for black, white, and a pop of color.

STAMPS: Irresistible Blooms (Retired)

PAPER: Basic Black and Basic White

INK:  Tuxedo Memento Black, Versa Mark, Real Red Stampin’ Blend, white embossing powder

TECHNIQUES:  Heat Embossing

School Colors

Part of this month’s theme was to make a card using a color combination that has meaning to me.  Well, in this card I managed to pay homage to all three of my Alma Maters; Struthers High School (red & black), Youngstown State University (red & white), and University of Colorado, Colorado Springs (black & gold). I created a red background by coloring a clear clear block (E) with my Real Red Stampin’ Write marker, spritzing it with water, and then stamping it onto a piece of watercolor paper.  Tthen used an aqua painter to smooth out the ink.

STAMP: Thoughtful Wishes

PAPER: Basic Black, Real Red, Basic White, Watercolor Paper

INK:  Memento Tuxedo Black, Real Red Crushed Curry

ACCESSORIES:  Thoughtful Wishes Dies, Real Red Stampin’ Write Maarker, Aqua Painter, Clear Block E, Stampin’ Spritzer

Another Color Challenge Remake

These are colors I would have never thought of putting together, but after looking at another color challenge….TA–DA!

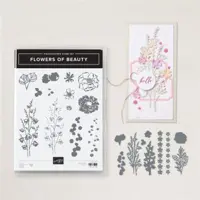
STAMPS:  Flowers of Beauty

PAPER:  Blueberry Bushel, Highland Heather, Basic White

INK:  Blueberry Bushel, Petal Pink, Peach Pie

ACCESSORIES:  Flowers of Beauty Dies, Perennial Postage Dies, Iridescent Pearls, 3/8″ Peach Pie Ribbon, Basics Embossing Folders.

My Favorite

This card is my favorite!  I used the reverse emboss blackout technique to create this card.  It is done by dragging your ink pads over the back side (indented side) of an embossed piece so that only the raised edges catch the color.  You start with the colors you want first, and then you add the black to the background.  The hues in this card remind me of fall.

STAMPS:  Changing Leaves

PAPER:  Pretty Peacock, Wild Wheat, Basic White, Crushed Curry

INK:  Pretty Peacock, Crushed Curry, Wild Wheat, Memento Tuxedo Black

ACCESSORIES:  Changing Leaves Hybrid Embossing Folder & Dies, Crushed Curry Baker’s Twine, Opal Rounds

TECHNIQUES:  Reverse Emboss Blackout

So that is it for this month.  Hope you enjoyed your visit.  Until next time…

Happy Stamping!


Road Trip!

Hi Stampers,

Hope you enjoyed my last post which was a technique video demonstrating the faux silk technique in stamping.

I am back this month to share my Splitcoast creations for last August that I made for their Dirty Dozen Design Team.  The theme for August 2024 was Vacations.  Who doesn’t like to go on a vacation, right?  We were tasked to create cards reflecting places we like to visit , would like to visit in  the future, and places we have already visited.  The catch phrase was “the mileage may vary.”

I had fun with this theme because I LOVE to travel and have been blessed with the opportunity to visit many places both while I was on active duty in the military and since my retirement from teaching in 2014.  As I always say to anyone who may ask, “My suitcase is always packed!” I hope you enjoy looking at these cards as much as I enjoyed creating them.

DISCLAIMER:  All of the products I used in the creation of the following cards are Stampin’ Up!; however, there is one card that contains some non-Stampin’ Up! Product. Also, some Stampin’ Up! products used are retired and will be indicated.

Road Trip!

I am always ready for a road trip!  I’ve been on many in my lifetime.  there have been numerous trips from Southern Colorado to Northeastern Ohio and Pennsylvania to visit family, trips to California, around Colorado, Wyoming, the Black Hills in Western S. Dakota, cross country to Virginia Beach and too many other places to mention.  But, no matter how much the mileage for each trip may vary, it’s always fun to visit a new place by car, especially since you can bring as many pairs of shoes as you want!  🙂

These are the items I used in this card:

STAMPS:  Coming Home and Travel Log (both retired)

PAPER:  Crumb Cake, Basic White

INK:  Memento Tuxedo Black, Real Red Stampin’ Blends, Azure Afternoon, Crumbcake

TECHNIQUE:  Sponging

Purple Mountains Watercolor

The mountains always seem like the ideal vacation spot to me! Fresh mountain air, sunshine, trees, and water…what more could you ask for?

These are the items I used in this card:

STAMPS:  Mountain Air (retired), Encircled in Nature

PAPER:  Watercolor Paper, Fresh Freesia, Balmy Blue

ACCESSORIES: Aqua Painter, Stampin’ Spritzer

TECHNIQUES:  Watercolor Spritz

“We’ll always have Paris”

I had to go back a few years in my stamp stash for this stamp set too.  Europe is an awesome place to visit while on vacation.  This card reminds me of the time I visited the City of Light back in the 80’s when I was stationed in Germany.  Even thought I like Paris, my favorite city is Florence, Italy.  Oh, the quotes is by Humphrey Bogart in Casablanca.

These are the items I used in this card:

STAMPS: Parisian Beauty (retired)

PAPER:  Basic Grey, Basic White, Vellum, Petal Pink, Flight & Airy DSP (retired)

INK:  Basic Gray

ACCESSORIES:  Parisian Dies, Deckled Circle Dies, Stylish Shapes Dies, Scripty 3D Embossing Folder.

Camper Camping Only!

Camping in Rocky Mountain National Park was always a fun way to spend a few days when my children were young. But, then we did it in a tent.  My tent days are over and I always imagine it would be wonderful to camp again…IN A CAMPER!

These are the items I used in this card:

STAMPS:  Simply Said, Forest Friends (retired)

PAPER:  Crumb Cake, Soft Seafoam, Lemon Lolly, Mossy Meadow, Basic White, Daffodil Delight, Silver Foil

INK: Memento Tuxedo Black, Pecan Pie, Real Red, Daffodil Delight, Azure Afternoon

ACCESSORIES:  Tree Lot and Majestic Mountain Dies (both retired)

Northern Lights

I used the Northern Lights technique on this card for this month because earlier tin 2024 they were visible here in Colorado!  I was fortunate in that I had the opportunity to visit Iceland in 2023 but didn’t go at the right time of year to see the lights.  Imagine what a treat it was to see them right here in my own backyard.  It was a great example of how the right astrological conditions can make the mileage vary!

These are the items I used in this card:

STAMPS:  Greatest Journey (retired)

PAPER:  Basic Black and White

INK:  Basic Gray, Black, Gorgeous Grape, Pumpkin Pie, Old Olive, Azure Afternoon, Berry Burst, Night of Navy, Versa Mark

ACCESSORIES:  Black & White Gingham Ribbon, White Emboss Powder, Heat Tool, White Chalk Marker, Greatest Journey Dies (retired)

TECHNIQUES:  Northern Lights & Heat Embossing

The Beach is My Happy Place

From the mountains to the beach! Depending on the directions of your travel (East Coast, West Coast, Southern Coast) your mileage will vary.  But, once you are there..there is nothing like the smell of ocean air and the feel of an ocean breeze on your skin.  The beach is definitely my happy place.  Come to think of it, I am going to be getting really happy very soon as I have a beach vacation coming up!

These are the items I used in this card:

STAMPS:  Paradise Palms (retired)

PAPER:  Coastal Cabana, Basic White, Crumb Cake, Early Espresso, Granny Apple Green

INK:  Early Espresso, Daffodil Delight, Coastal Cabana, Pool Party, Mossy Meadow

ACCESSORIES: Sponge Dauber, Lawn Fawn Beach Sunset Stencils, Seasonal Layers Thinlits (retired), Palms Dies (retired), Basic Borders Dies (retired)

That’s all for today!  Hope you enjoyed your time here…

Until next time…

Happy Stamping!

Faux Silk & Masking Techniques

Hi Stampers!

Last week I shared my creations for Splitcoast Stampers from last July, and I said I would share a technique video on one way to add texture to your cards.  I chose the faux silk method for the video, and I also included a little of the masking technique

Here are the two cards I created using the faux silk technique.  This technique requires the use of tissue paper and liquid glue and is very easy.

DISCLAIMER:  I’ve used several retired products in these two cards to include: Gold Baker’s Twine, Gold Adhesive Backed Swirls, Irresistible Blooms Stamp Set, Everyday Details Dies, Butterfly Brilliance Dies, and one of the Basics 3D Embossing Folders.  Everything else is current.


I hope you enjoy the video!


Until next time…

Happy Stamping!


Just Add Texture

Hello Readers!

I’m  back finally after a 6-month hiatus from blogging and sharing my work here and on other social media.  If you were here 6 months ago, I announced that I had been selected to be a part of Splitcoast Stampers Dirty Dozen Design team.  As a result, I had to agree that I wouldn’t share any of my creations on any social media sites except for  Splitcoast’s Fan Club Gallery.  December ended my 6-month commitment and I am now free to share! I hope you enjoy

DISCLAIMER: We were free to use products from any legitimate paper crafting manufacturer. Most of the products I used were from Stampin’ Up!, both current and retired; however, I did use a few things from other manufacturers, and I will give them credit.

In July 2024, the design team had to create six cards that included texture. The key word to keep in mind while creating was “rough”.  This is what I created.

Card #1

Black & White Sympathy

I embossed the card base with the Eyelet 3D Embossing folder.  I then cut a 3″ x 4″ piece of black card stock and placed a decorative mask over it and added texture paste to create the background.  the flower and sentiment are heat embossed.  There is a lot of rough-ness on this card.  Sympathy cards are sent when someone passes and…death of a loved one is rough.

All products used on this card are Stampin’ Up!

Stamps:  Thoughtful Wishes and Unbounded Love

Paper:  Basic Black

Ink:  VersaMark

Accessories:  Abundant Beauty Decorative Masks, Shimmery White Embossing Paste, White Embossing Powder, Eyelet 3D Embossing Folder.

Techniques:  Heat Embossing & Embossing Paste

Card #2

Faux Silk Anniversary

I stamped the roses from the Layers of Beauty stamp set onto tissue paper in black ink and colored the image with Stampin’ Write markers.  I  then wrinkled the tissue and glued it to a piece of white card stock with liquid glue.  I used a blending brush to lightly add a little Flirty Flamingo and Fresh Freesia ink to the strip from top to bottom on the left.

All products on this card are Stampin’ Up!

Stamps:  Layers of Beauty

Paper:  Granny Apple Green, Basic White, and Flirty Flamingo

Ink:  Tuxedo Memento Black, Flirty Flamingo, Granny Apple Green, and Fresh Freesia.

Accessories:  Basics 3D Embossing Folder, Deckled Circles Dies, Irresistable Blooms Dies

Techniques: Faux Silk/Linen Technique

Card #3

**My Favorite–Carousel Horse Note Card**

For this card, I rummaged through my material scraps and found this piece with heart designs and thought…why not?  I used liquid glue to attach it to a piece of card stock to create the textured background for the carousel horse.  I CASED the layout from another card.  THIS card is my FAVORITE from this month’s creations.  It’s girlie and I can convert it to a birthday card for one of my granddaughters.

All products are Stampin’ Up!

Stamps:  Carousel Horses, Stampin’ Up!

Paper: Soft Seafoam, Basic White

Ink:  Memento Tuxedo Back, Wild Wheat, and Pretty in Pink

Accessories:  Scallop contour dies, Carousel Horses dies, Pretty in Pin 3/8″ Bordered Ribbon

Techniques:  Cloth on paper background

Card #4

Zinnia Birthday

Even though the surface of the vellum is smooth to the touch, the use of alcohol marker mixed with spritzed alcohol creates the appearance of a rough/textured surface on this next card.  I really like this card and this technique!

All products used on this card are Stampin’ Up!

Stamps:  Simply Zinnia and Simply Said

Paper:  Basic White, Basic Black, and Vellum

Ink:  Memento Tuxedo Black, Versa Mark, Melon Mambo, Old Olive

Accessories:  Everyday Details Dies, Simply Zinnia Dies, heat tool, white embossing powder, alcohol and spritzer.

Techniques:  Alcohol markers on vellum & heat embossing.

Card #5

Strawberry Ice Cream

The Ice Cream Swirl Dies added texture to the cone  on the next card, and the glimmer paper I used adds texture to the ice cream.  This card screams summer to me and at this point in January in Colorado I feel done with winter!

All items used are Stampin’ Up!

Stamps:  Ice Cream Swirl

Paper:  Crumb Cake, Balmy Blue, Azure Afternoon, Bubble Bath, White, Lighter than Air DSP, and Sweet Sugarplum Glimmer Paper

Ink:  Azure Afternoon, Lemon Lolly, Flirty Flamingo, and Crumb Cake

Accessories:  Ice Cream Swirl Dies

Card #6

Christmas in July

In order to add texture to this card, I embossed the background with the Merry Melody 3D Embossing Folder.  I then tore it by hand from the top left corner to the mid-right edge.  I added liquid glue to the torn edge and added glitter.  One tree is cut from paper and the other from green felt.  I added glitter to the trees, and I dabbed little specs of glue to the top right card base and added glue so you have a card covered in texture. I went really far back into my stamp stash for this stamp set and die!

All items used are Stampin’ Up!

Stamps:  Stars at Night

Paper:  Basic White and Garden Green

Ink:  Garden Green

Accessories:  Glitter, Santa’s Sleigh Framelits, Merry Melody 3D Embossing Folder

As I sat here typing up this post I thought it might be a good idea to do a video or two showcasing a few of the techniques I used here in these cards.  Stay tuned!

Until next time…

Happy Stamping!


Shop online 24/7

http://www.fancyforstampin.stampinup.net